Getting sharp images is not always about better focusing. Often it is about reducing motion blur, specifically, your motion. Many of today’s cameras and lenses have image stabilization technology that is designed to reduce camera shake. Let’s look at how and when to use image stabilization for sharper images.
What Is Image Stabilization?
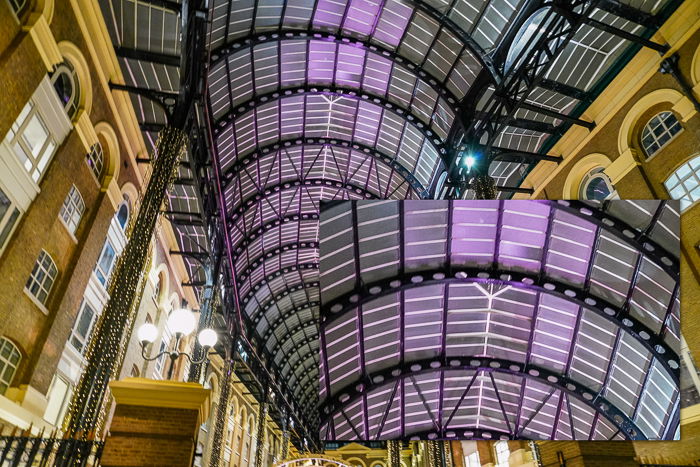
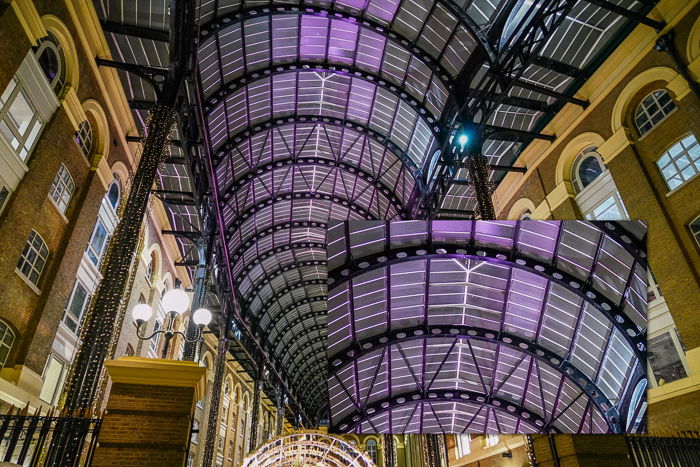
Image stabilization reduces the small motions you make when handholding your camera. Almost unnoticeable. You will notice camera shake at slow shutter speeds. This is because we cannot hold the camera still enough for a clean shot, so there is a slight blur. You can really see this if you zoom in on an image with a clean line or a light source. If you always shoot at fast shutter speeds, then you probably don’t need image stabilizing technology. The shutter is not open long enough for the picture to blur. If you always use a tripod, then you also don’t need extra stabilization. We will talk more about when to turn off this feature later in the article.
What’s the Best Shutter Speed When Handholding?
When handholding your camera, set your shutter speed faster than one over your focal length. This is called the Reciprocal Rule. Think of it as the Handholding Rule. For example, if your focal length is 100mm, set your shutter faster than 1/100th of a second. If your focal length is 200mm, your shutter should be faster than 1/200th of a second. Using a shutter speed slower than this recommendation can cause motion blur. Of course, there are more factors than just focal length that affect whether your photos are shaky. Some photographers are naturally steadier than others. Some have a very stable photography stance or lean on a tree or post. On another day, maybe you’re feeling jittery after too much caffeine! This will all affect the camera shake in your images. The Reciprocal Rule is pretty simple, but it has little to do with real-life photography. You don’t have to look far to see photographers breaking the rule. So how are they doing it? How do they get clear images at a slower shutter speed? The answer may be in their image stabilization systems.
How do Image Stabilization Systems Work?
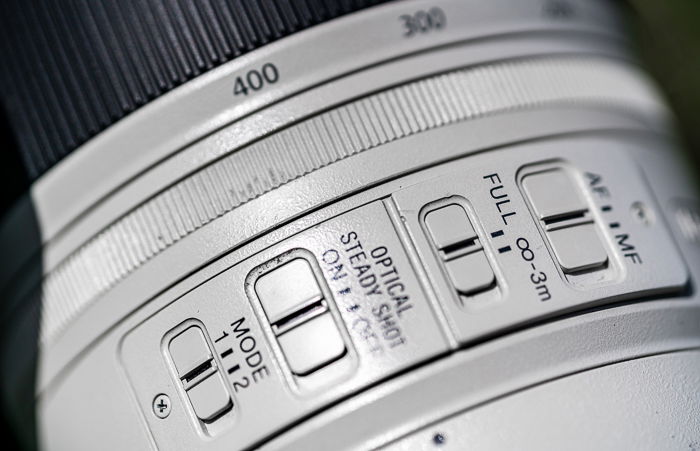
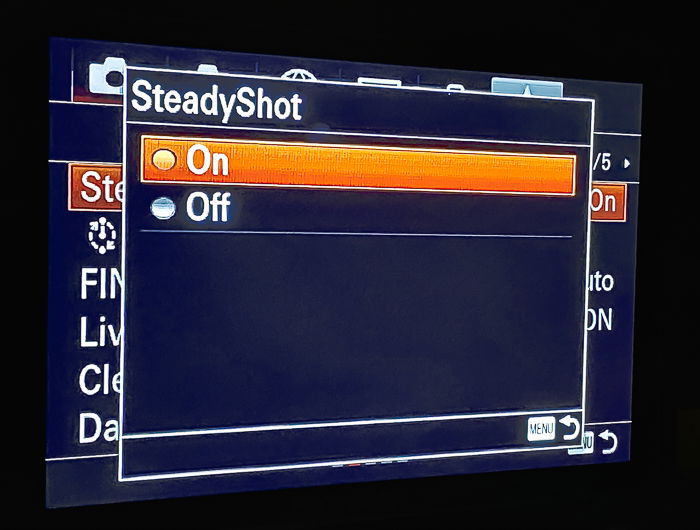
Camera manufacturers began exploring image stabilization technology in the mid-1990s. It has improved with each generation of digital cameras. The stabilization system can be in the lens, or it can be in the camera. Or it can be in both. Image stabilization is a system of gyros and microcomputers attached to either a floating lens element or sensor. The gyros detect the slightest movements of your camera. The information is sent to the microcomputer, which moves the elements in the opposite direction to compensate. All this is going on behind the scenes without you even noticing. You can control camera-body image stabilization systems from the menu system. Lenses with image stabilization may have a switch to turn them on and off.
Electronic vs Optical Image Stabilization
Mobile phones like iPhones also have stabilization, but the system works virtually. Algorithms counteract camera shake. In your camera or lens, the system is optical and physical. The element moves to counter camera shake. Cameras may also include electronic image stabilization. The camera consists of software that digitally adjusts the image to counteract camera shake. Electronic image stabilization is mainly found on high-end digital cameras like the Sony A7RIV.
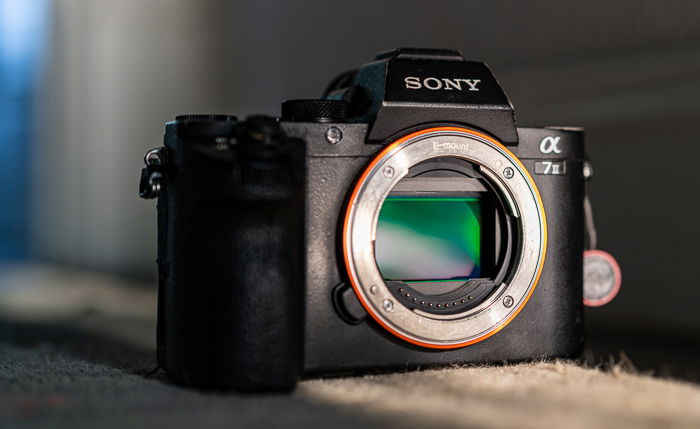
In-Camera vs Lens Stabilization
Until recently, Canon and Nikon have favoured lens-based stabilization systems. The image stabilization system is calibrated a little differently for each lens. Lens manufacturers may offer a lens with and without image stabilization. As you might imagine, lens stabilization is more expensive. Sometimes a lot more expensive. You buy the stabilization system every time you buy a lens. With in-camera image stabilization, you buy the system once. It will work with all your lenses. Sony, Olympus, and Pentax have put image stabilization in their cameras. This means that any lens attached to the body will benefit from the technology. Canon and Nikon now also include stabilization technology in their mirrorless camera bodies. In-camera and lens stabilization can work together for a steadier shot. For instance, the Sony A7R3 has a 5-axis stabilization system. Three axes work on the sensor, and two adjust the lens. The technology goes by many names, including Optical Image Stabilization (OIS), Optical SteadyShot, Vibration Compensation (VC), or Vibration Reduction (VR). Some terms denote a specific technology—others are brand-specific labels.
Image Stabilization and Telephoto Lenses
Camera shake is more apparent with telephoto lenses. The lenses tend to be larger and heavier than wide-angle lenses, so they are more difficult to handhold. The Reciprocal Rule means wide-angle lenses can often be handheld at slow enough shutter speeds to avoid camera shake.
Measuring Image Stabilization
Image stabilization is measured in additional stops of light. With the Reciprocal Rule, this means that for a 100mm lens, an extra stop of light means that you can handhold your camera at 1/50th of a second without noticeable camera shake. An additional two stops of light will let you handhold the camera at 1/25th of a second. Some stabilization systems add up to 5 stops of light. This means you could potentially handhold your 100mm lens at 1/3rd of a second! This, in conjunction with better ISO performance on today’s cameras, means that you only need to pull out a tripod when your shutter speed lengthens towards a second. With image stabilization, you can handhold your camera at a slow shutter speed. But just because you can, doesn’t mean that you have to. The technology gives you flexibility in low light. For example, if you are shooting with 100mm, you don’t have to slow your shutter speed down to 1/3rd of a second. Instead, slowing your shutter speed down one stop to 1/50th of a second may be enough to get the light you need. As a result, you have a wide range where you are likely to get sharp images.
When to Turn Image Stabilization Off
Image stabilization sounds great. It will help you make sharper images at slower shutter speeds. But it is not always the right setting to use. Sometimes it is better to find the off switch.
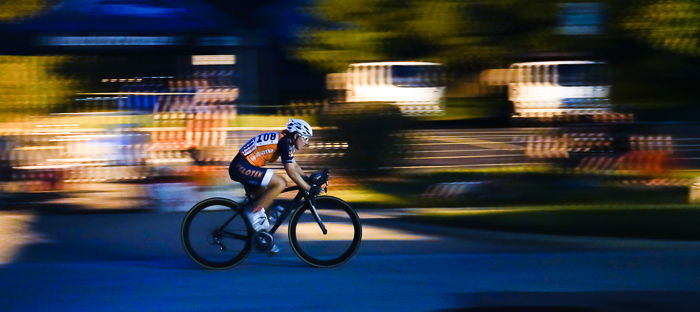
Panning and Intentional Motion
Turn off the stabilization feature if you are intentionally moving the camera. Like when you are panning. Panning is when you follow a moving subject with your camera. This keeps the subject in focus but adds motion blur to the background. Some image stabilization systems can figure out what you are doing and switch itself off. Otherwise, image stabilization works against your panning efforts.
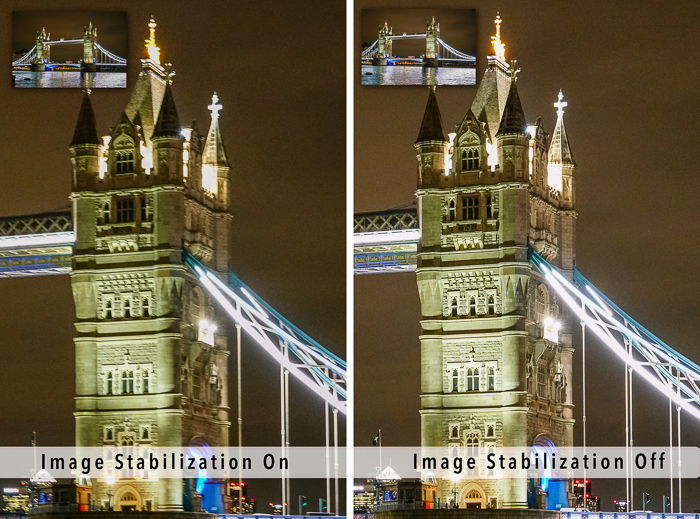
Shooting With Your Camera On a Tripod
The ultimate image stabilization system is your tripod. When using a tripod, switch image stabilization off. This may seem counterintuitive. If a tripod is already stabilizing your camera, you may expect the image stabilization system to sit idle. But image stabilization systems are made to detect even the slightest movements. They pick up the small internal vibrations of your camera. Image stabilization pulls the internal elements in the opposite direction. This causes more movement and creates a feedback loop. The image stabilization system introduces motion into the frame. This is a perfect time to turn off is and let your tripod do the work.
Your Subject is Moving
Image stabilization is designed to detect camera motion. It is not designed to reduce the motion of your subject. A person running across your frame will still blur at low shutter speeds. Image stabilization won’t help capture a bird in flight. If you are shooting sports at a fast shutter speed, consider turning image stabilization off. It won’t help you and may even get in the way.
You’re Battery is Running Low
If you have problems with battery life or are running short on juice, switch off the image stabilization. It takes a lot of energy to run the system.
Conclusion
Image stabilization affects image quality. When you are handholding your camera in low-light situations, image stabilization can make your images sharper. But image stabilization can also hurt image quality. For instance, when your camera is mounted on a tripod. Image stabilization is only important if you shoot in low light situations where you need slower shutter speeds. Image stabilization isn’t for you if you often shoot at 1/500th of a second in lots of light or are mostly on a tripod. You can turn it off in the menu system and save a bit of cash by buying non-IS lenses. But if you often handhold and want sharper images at slower shutter speeds, then image stabilization is for you. If you want some cheat sheets to help you capture stunning images, check out our Quick Capture Cheat Sheets.


title: “What Is Image Stabilization How And When To Use It " ShowToc: true date: “2023-02-12” author: “Nicholas Mathews”
Getting sharp images is not always about better focusing. Often it is about reducing motion blur, specifically, your motion. Many of today’s cameras and lenses have image stabilization technology that is designed to reduce camera shake. Let’s look at how and when to use image stabilization for sharper images.
What Is Image Stabilization?
Image stabilization reduces the small motions you make when handholding your camera. Almost unnoticeable. You will notice camera shake at slow shutter speeds. This is because we cannot hold the camera still enough for a clean shot, so there is a slight blur. You can really see this if you zoom in on an image with a clean line or a light source. If you always shoot at fast shutter speeds, then you probably don’t need image stabilizing technology. The shutter is not open long enough for the picture to blur. If you always use a tripod, then you also don’t need extra stabilization. We will talk more about when to turn off this feature later in the article.
What’s the Best Shutter Speed When Handholding?
When handholding your camera, set your shutter speed faster than one over your focal length. This is called the Reciprocal Rule. Think of it as the Handholding Rule. For example, if your focal length is 100mm, set your shutter faster than 1/100th of a second. If your focal length is 200mm, your shutter should be faster than 1/200th of a second. Using a shutter speed slower than this recommendation can cause motion blur. Of course, there are more factors than just focal length that affect whether your photos are shaky. Some photographers are naturally steadier than others. Some have a very stable photography stance or lean on a tree or post. On another day, maybe you’re feeling jittery after too much caffeine! This will all affect the camera shake in your images. The Reciprocal Rule is pretty simple, but it has little to do with real-life photography. You don’t have to look far to see photographers breaking the rule. So how are they doing it? How do they get clear images at a slower shutter speed? The answer may be in their image stabilization systems.
How do Image Stabilization Systems Work?
Camera manufacturers began exploring image stabilization technology in the mid-1990s. It has improved with each generation of digital cameras. The stabilization system can be in the lens, or it can be in the camera. Or it can be in both. Image stabilization is a system of gyros and microcomputers attached to either a floating lens element or sensor. The gyros detect the slightest movements of your camera. The information is sent to the microcomputer, which moves the elements in the opposite direction to compensate. All this is going on behind the scenes without you even noticing. You can control camera-body image stabilization systems from the menu system. Lenses with image stabilization may have a switch to turn them on and off.
Electronic vs Optical Image Stabilization
Mobile phones like iPhones also have stabilization, but the system works virtually. Algorithms counteract camera shake. In your camera or lens, the system is optical and physical. The element moves to counter camera shake. Cameras may also include electronic image stabilization. The camera consists of software that digitally adjusts the image to counteract camera shake. Electronic image stabilization is mainly found on high-end digital cameras like the Sony A7RIV.
In-Camera vs Lens Stabilization
Until recently, Canon and Nikon have favoured lens-based stabilization systems. The image stabilization system is calibrated a little differently for each lens. Lens manufacturers may offer a lens with and without image stabilization. As you might imagine, lens stabilization is more expensive. Sometimes a lot more expensive. You buy the stabilization system every time you buy a lens. With in-camera image stabilization, you buy the system once. It will work with all your lenses. Sony, Olympus, and Pentax have put image stabilization in their cameras. This means that any lens attached to the body will benefit from the technology. Canon and Nikon now also include stabilization technology in their mirrorless camera bodies. In-camera and lens stabilization can work together for a steadier shot. For instance, the Sony A7R3 has a 5-axis stabilization system. Three axes work on the sensor, and two adjust the lens. The technology goes by many names, including Optical Image Stabilization (OIS), Optical SteadyShot, Vibration Compensation (VC), or Vibration Reduction (VR). Some terms denote a specific technology—others are brand-specific labels.
Image Stabilization and Telephoto Lenses
Camera shake is more apparent with telephoto lenses. The lenses tend to be larger and heavier than wide-angle lenses, so they are more difficult to handhold. The Reciprocal Rule means wide-angle lenses can often be handheld at slow enough shutter speeds to avoid camera shake.
Measuring Image Stabilization
Image stabilization is measured in additional stops of light. With the Reciprocal Rule, this means that for a 100mm lens, an extra stop of light means that you can handhold your camera at 1/50th of a second without noticeable camera shake. An additional two stops of light will let you handhold the camera at 1/25th of a second. Some stabilization systems add up to 5 stops of light. This means you could potentially handhold your 100mm lens at 1/3rd of a second! This, in conjunction with better ISO performance on today’s cameras, means that you only need to pull out a tripod when your shutter speed lengthens towards a second. With image stabilization, you can handhold your camera at a slow shutter speed. But just because you can, doesn’t mean that you have to. The technology gives you flexibility in low light. For example, if you are shooting with 100mm, you don’t have to slow your shutter speed down to 1/3rd of a second. Instead, slowing your shutter speed down one stop to 1/50th of a second may be enough to get the light you need. As a result, you have a wide range where you are likely to get sharp images.
When to Turn Image Stabilization Off
Image stabilization sounds great. It will help you make sharper images at slower shutter speeds. But it is not always the right setting to use. Sometimes it is better to find the off switch.
Panning and Intentional Motion
Turn off the stabilization feature if you are intentionally moving the camera. Like when you are panning. Panning is when you follow a moving subject with your camera. This keeps the subject in focus but adds motion blur to the background. Some image stabilization systems can figure out what you are doing and switch itself off. Otherwise, image stabilization works against your panning efforts.
Shooting With Your Camera On a Tripod
The ultimate image stabilization system is your tripod. When using a tripod, switch image stabilization off. This may seem counterintuitive. If a tripod is already stabilizing your camera, you may expect the image stabilization system to sit idle. But image stabilization systems are made to detect even the slightest movements. They pick up the small internal vibrations of your camera. Image stabilization pulls the internal elements in the opposite direction. This causes more movement and creates a feedback loop. The image stabilization system introduces motion into the frame. This is a perfect time to turn off is and let your tripod do the work.
Your Subject is Moving
Image stabilization is designed to detect camera motion. It is not designed to reduce the motion of your subject. A person running across your frame will still blur at low shutter speeds. Image stabilization won’t help capture a bird in flight. If you are shooting sports at a fast shutter speed, consider turning image stabilization off. It won’t help you and may even get in the way.
You’re Battery is Running Low
If you have problems with battery life or are running short on juice, switch off the image stabilization. It takes a lot of energy to run the system.
Conclusion
Image stabilization affects image quality. When you are handholding your camera in low-light situations, image stabilization can make your images sharper. But image stabilization can also hurt image quality. For instance, when your camera is mounted on a tripod. Image stabilization is only important if you shoot in low light situations where you need slower shutter speeds. Image stabilization isn’t for you if you often shoot at 1/500th of a second in lots of light or are mostly on a tripod. You can turn it off in the menu system and save a bit of cash by buying non-IS lenses. But if you often handhold and want sharper images at slower shutter speeds, then image stabilization is for you. If you want some cheat sheets to help you capture stunning images, check out our Quick Capture Cheat Sheets.
