Topaz Photo Ai Review: What You Need to Know About Topaz Sharpen AI
Topaz Labs Sharpen AI does exactly what it says. It’s designed to improve sharpness (and reduce noise). And it’s based on the analysis of millions of images using artificial intelligence. I read a few reviews and watched a couple of videos online before trying it out. I was amazed by the transformations. The Motion Blur mode was particularly impressive. One example turned a bird’s eye from a blurred mess to a pin-sharp image. Also, the idea that the program can somehow “know” what the subject’s focus point was behind or in front… and correct it! That was mind-blowing! The original program came out a few years ago, and it wasn’t very good. But the frequent updates have improved it so much that it’s now the leading sharpening tool on the market. Yes, you might get similar results with an unsharp mask in Adobe Photoshop. But who has time to learn all about those from scratch? Topaz Sharpen AI also has a simple, intuitive interface that anyone can understand. It works straight out of the box with sliders and options for image sharpening and noise reduction.
Is Topaz Labs Sharpen AI Meant for You?
Every photographer makes mistakes and has images that could be a bit sharper. It usually comes down to camera shake, the wrong choice of shutter speed, or missing focus. Although, it might also be a limitation of your cameras and lenses. As a result, Topaz Labs Sharpen AI works for all types of photographers—from landscape and wildlife to street and portrait. It doesn’t matter if you’re a professional photographer or an absolute beginner. Sharpen AI can help at every level. Topaz Labs has a suite of three main programs—Sharpen AI, DeNoise AI, and Gigapixel AI. You can buy them individually or as a set for a one-off fee. But it’s worth taking advantage of the free trial. Both Sharpen AI and DeNoise AI offer image sharpening and noise reduction. But, as the names suggest, they each have a different focus. Gigapixel AI is used for increasing the file size of your images. That’s handy if you’ve cropped in heavily or don’t have enough pixels to play with. Once you download Sharpen AI and install it, you’re ready to go. If you use Topaz Sharpen AI as standalone software, you can drag images directly into the main window (or onto the dock icon on a Mac). Or you can click “Browse Images” to find the pictures you want. You can also right-click on any image in Lightroom or Photoshop. Then select “Edit In” from the top menu and pick “Topaz Sharpen AI” from the list. (The program is automatically added to this menu when you install it.)
Key Features—How Does Topaz Sharpen AI Work?
Topaz Sharpen AI boasts many useful features. Let’s go over its main post-processing options.
Different Models
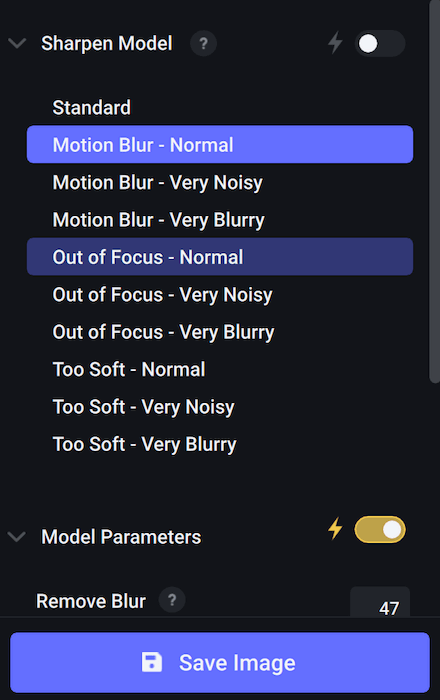
There’s always a trade-off between sharpening and noise reduction. So getting the best out of Sharpen AI is more of an art than a science. But if the program knows how the blur is caused, it has a better chance of getting rid of it. So it pays to use the right Sharpen AI model. There are four models to choose from:
Standard is the most recent model Topaz has introduced. It offers a good starting point for general sharpening. Motion Blur is the model to choose if you want to correct for camera shake or if the shutter speed wasn’t high enough to freeze the movement of your subject. This works best most of the time, followed by Standard. Out of Focus mode is the one you need if you focus on the wrong part of the subject. The model works out where the focus point is and moves it forward or backward to where it should be (usually the eyes). Too Soft is just another general sharpening model. But it’s helpful if you want to avoid artifacts as it’s generally less extreme. It’s beneficial when the other options are over-sharpening the image, and you want to make it look more natural.
Each model (apart from Standard) is split into Normal, Very Noisy, and Very Blurry. “Normal” is the default, but you can choose either of the other two options if image quality suffers from significant noise or blur.
Automatic Settings
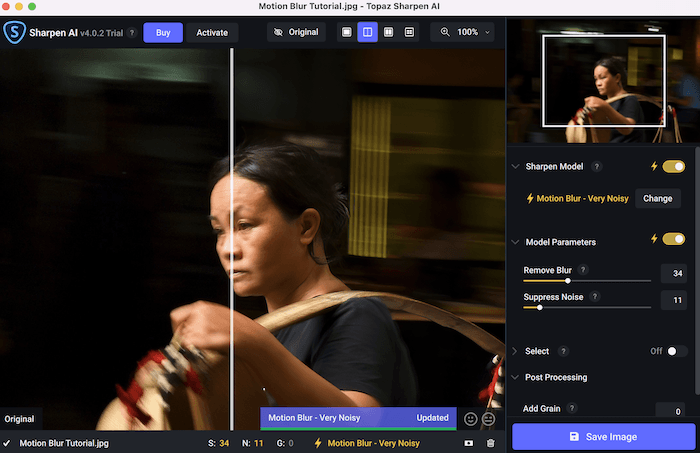
Topaz Sharpen AI is the best sharpening program on the market in terms of performance. But one of its other strengths is the user-friendly interface. It offers a great deal of automation. For instance, if you automate the Sharpen model (sharpen mode) and the model parameters, you don’t need to do a thing before saving the file! How much you decide to do manually is totally up to you. But it’s convenient to see what the automatic settings do first. If you’re not happy with the result, you can change the Sharpen model. Or you can play around with the model parameters using the Remove Blur and Suppress Noise sliders. That means you don’t need to know anything about the technicalities of photography to fix image quality. For example, you might not know if your shutter speed was too slow or where precisely the focus point was. But that doesn’t matter. You can compare the results of all the different Sharpen models and model parameters and pick the best one!
Masking
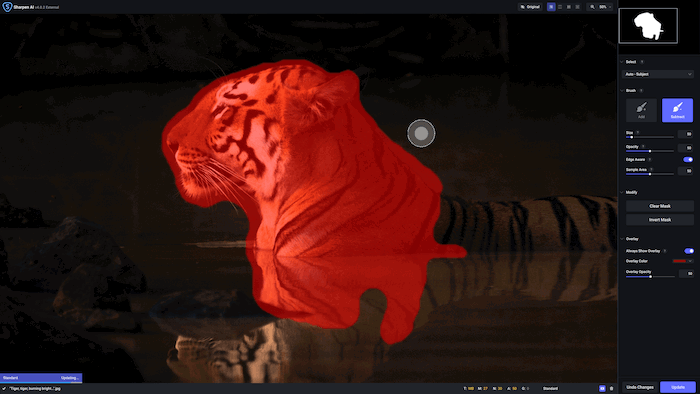
Topaz Sharpen AI is getting better and better at identifying the subject in a photograph and trying not to sharpen the background. But it doesn’t always get it right. That’s where masking comes in. In an ideal world, you sharpen the subject and remove noise across the whole image—particularly the background. But if the program doesn’t pick out the subject correctly, it sharpens details that should be blurred. Or it blurs things that should be sharp. Fortunately, you can “help” the program identify the subject by using the Select menu option.
If you set the toggle switch to “On,” Topaz Sharpen AI automatically tries to find the subject. And you can replace Auto > Subject with Auto > Portrait or Auto > Landscape. There’s also a Custom mode. If you click Refine, you can use a brush to edit the mask. And there are Add and Subtract buttons and Size, Softness, and Opacity sliders. You can also select Edge Aware (the equivalent of Auto Mask in Lightroom). Under the Modify drop-down, you can hit Clear Mask to delete it or Invert Mask to reverse the selection. Under the Overlay drop-down, there are options to toggle it on and off or change the color and opacity.
Remember, unselected areas won’t have sharpening or noise reduction applied to them. In other words, there’s no way of sharpening your subject and blurring the background at the same time if you use a mask.
Flexible Viewing
The easiest way to check the sharpness of a photograph is to compare two or more versions of it side-by-side. Sharpen AI makes it very easy to do that. There’s a preview window you can click on to center the image wherever you want. You then have four different view options:
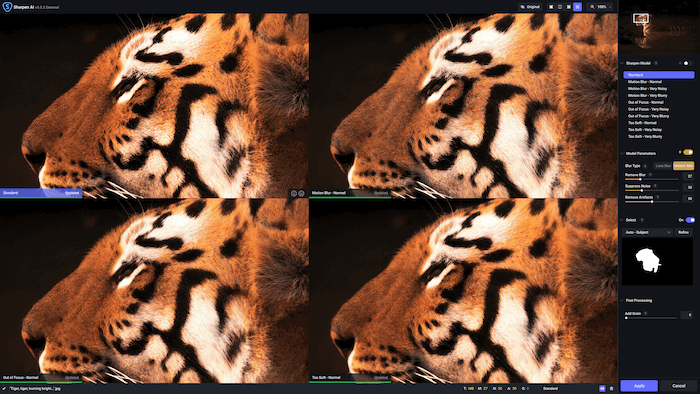
Single View shows the sharpened image full screen. Split View shows the original image on the left and the sharpened version on the right. It has a dividing line you can move around. Side-by-Side View shows the sharpened and original images side-by-side. Comparison View shows four different sharpened images in four separate windows.
Comparison View is probably the most useful. You see the effect of all four Sharpen models at the same time. But it stops you from automating the choice of model. You can also click and hold the Original button for comparison purposes. Once you let go, the image goes back to the sharpened version. Or you can click on the image to see the original image. This is the best way to get a before-and-after view. Finally, a zoom button offers “Zoom to Fit,” 50%, 100%, 200%, and 400% presets (with keyboard shortcuts). You can also enter a value in a text box or use the slider provided.
Grain
If all else fails, you can always add grain to your image. This adds a bit of texture, breaks up areas that are “too smooth,” and disguises any remaining noise. You don’t have to do this using Sharpen AI’s Add Grain slider. You can, of course, do the same in Lightroom or Photoshop. But it’s handy not to have to go back to another program.
Bulk Editing
If you have multiple images to get through, Sharpen AI gives you the option of bulk editing them. You can drag the files into the main window from Finder or File Explorer. Then click the checkboxes for individual images to change the AI model and other settings for all the selected files. It’s quite a convenient, time-saving option. But I don’t often use it because it’s a bit too risky. I want to make sure that every image is perfect, and I don’t trust the software to do that…yet! One limitation to note. DeNoise AI and particularly Sharpen AI used to take a long time to save files. And it still takes between 30 seconds and a minute for a 20MB JPEG file. But it’s getting better with each release.
Alternatives to Topaz Sharpen AI
There are plenty of alternatives to Sharpen AI on the market. But these are your best options:
Adobe Photoshop is probably the best alternative. Different options in the filter menu include Sharpen Edges, Shake Reduction, and Sharpen Mask. A Smart Sharpen tool also uses AI to sharpen the entire image. But it’s much less user-friendly. And it requires a working knowledge of layers and masks that few photographers have. Plus, it’s only available via a monthly subscription, Focus Magic is a program that produces good results, particularly with motion blur. It offers several advanced sharpening filters, including Fix Motion Blur, Increase Resolution, and Despeckle. But it’s a steep learning curve, and you can only use the free version for ten images. After that, you have to pay a one-off fee. Blurity is a fast and user-friendly program that’s great for eliminating motion blur. But the results are variable. A lot depends on the initial selection using the masking tool. The free version is also subject to limited usage, so you may have to pay a one-off fee. InPixio Photo Focus is a user-friendly program with a decent sharpening tool. But it doesn’t offer very much control or customization.
Verdict
Any Topaz Sharpen AI review must admit it’s a brilliant photography tool. I’m a big fan of sharp images in my wildlife photography. And this program allows me to “rescue” dozens of shots that would be unusable or just plain embarrassing. On some occasions, Sharpen AI can’t fix the image. But it’s still the best option out there if you’re not a Photoshop expert. And Photoshop has only recently started to use artificial intelligence and machine learning. Try Topaz Sharpen AI out for yourself. You can enjoy a free trial and if you decide to purchase the program, save 15% using the coupon code EXPHOTO15.
Scores


